Appearance
子应用集成
现有系统集成到我们的微前端方案,并不需要大刀阔斧的重构,更多的是做'减法'。很多东西都不需要了。
TIP
注意。下文大部分改造步骤都是可选的,或者只是最佳实践。微前端基座并没有严格要求子应用必须调用它提供的 API 或者组件,这些完全是可选的。
最小化的改造只会涉及菜单隐藏、子应用注册等步骤, 详见 外部系统集成。
1. 统一使用 vue-cli 5+
vue-cli 是惟客规范定义的 B 端构建工具。第一步请确保你的项目使用 vue-cli, 并升级到 vue-cli 5+
DANGER
未来可能支持 vite,但是目前 vite 在 qiankun 微前端框架下并不能完美使用。敬请期待我们后续的更新
INFO
这并不是说,我们只能用 vue-cli。其他构建工具也可以,只不过我们提供了 vue-cli 插件,可以更方便地让子应用集成进来, 开箱即用。
相关链接:
2. 子应用描述信息
子应用需要在基座中注册一些关键的信息,基座才知道如何加载和渲染子应用。
| 字段名 | 描述 | 默认值 |
|---|---|---|
🔴 name: string | 应用名称, 必须唯一。 如果集成的是 @wakeadmin/vue-cli-plugin-mapp-child 在控制台可以看到生成的应用名称 | 必填 |
🔴 entry: string | 子应用的 HTML 入口, 例如 /__apps__/vue3, 指向微应用的静态资源的目录即可。本地开发时可以指向本地路径,例如 //localhost:17355 | 必填 |
🔴 activeRule: string | string[] | 激活的路由, 路由前缀,以 / 开始,例如 /wkb, 当路由以 /wkb 前缀时,基座会启动并渲染对应的子应用。注意不需要包含基座 base,会自动添加。 | 必填 |
container?: string | HTMLElement | 挂载的 DOM 节点, 默认为 #root。这个通常由基座提供挂载点,保持默认就行了 | #root |
props?: Record<string, any> | 传递给子应用的参数, 可以在这里放置一些元数据 | |
version?: string | 子应用版本号。描述信息,不会影响实际渲染 | |
description?: string | 应用描述。描述信息,不会影响实际渲染 | |
independent?: boolean | 独立模式。 一般情况下微应用都是挂载在由基座的提供的页面框架内,某些特殊场景,微应用要完全接管一个页面,比如登录。这时候就开启 | false |
routeMode?: 'hash' | 'history' | 路由模式 | 'hash' |
alias?: string | 用于多业态应用,绑定到同一个身份上, 详见 多业态应用 |
其中最关键的只有三个参数: name、entry、activeRule。这三个参数的意义请开发者务必要清楚。
WARNING
注意,如果 activeRule 为数组, 那么 openByAppName 接口调用可能出现歧义,这时会默认打开第一个
3. 引入子应用集成插件
安装 @wakeadmin/vue-cli-plugin-mapp-child 插件:
$ pnpm add @wakeadmin/vue-cli-plugin-mapp-child -D
并在 vue.config.js 中配置:
const { defineConfig } = require('@vue/cli-service');
const { defineMappChild } = require('@wakeadmin/vue-cli-plugin-mapp-child');

module.exports = defineConfig({
  transpileDependencies: false,
  pluginOptions: {
    ...defineMappChild({
      mapp: {
        activeRule: '/dsp.html',
      }
    }),
  },
  lintOnSave: false,
});
defineMappChild 支持以下参数:
| 名称 | 描述 | 默认值 |
|---|---|---|
name?: string | 微应用名称,默认从 package.json name 读取,并转换为驼峰形式 | camelCase(package.name) |
mapp?: MappSingle | MappMultiple[] | 微应用描述信息 | |
constants?: Record<string, string> | 自定义变量,详见下文 避免硬编码配置信息 |
高级参数, ⚠️ 建议保持默认值:
| 名称 | 描述 | 默认值 |
|---|---|---|
terminalMode?: boolean | 是否在微前端运行容器下运行。微前端运行容器支持模板 | true |
CDNDomain?: string | CDN 域名,如果静态资源需要由 CDN 分发,则需要配置此项, 如果开启了 terminalMode, CDNDomain 默认为 [%= cdnDomain ? '//' + cdnDomain : '' %] | |
baseUrl?: string | 主应用基础路径,默认为 '/' , 建议和主应用配置一致。如果开启了 terminalMode, baseUrl 默认为 [%= removeTrailingSlash(base) %] | |
publicPath?: string | 微应用 publicPath,默认为 auto, 即 <CDNDomain><base>/__apps__/<name>/ | auto |
shared?: SharedDeclaration[] | 从基座中共享的依赖,必须精确匹配。详见 通用依赖共享 |
INFO
[%= var %] 是 运行容器 的模板语法。
在大部分的场景下,你只需要配置 activeRule、name 等关键信息即可。其他信息保持默认配置。
3.1 单页应用配置示例
const { defineConfig } = require('@vue/cli-service');
const { defineMappChild } = require('@wakeadmin/vue-cli-plugin-mapp-child');

module.exports = defineConfig({
  transpileDependencies: false,
  pluginOptions: {
    ...defineMappChild({
      // 默认从 package.json 中读取
      name: 'dsp',
      mapp: {
        // 子应用的激活路由,默认为 /<name>
        activeRule: '/dsp.html',
        // 独立模式,默认为 false
        // independent: false,
        // 应用别名, 详见多业态应用文档
        alias: 'dsp';
      }
    }),
  },
  lintOnSave: false,
});
3.2 多页应用配置示例
const { defineConfig } = require('@vue/cli-service');
const { defineMappChild } = require('@wakeadmin/vue-cli-plugin-mapp-child');

module.exports = defineConfig({
  // 多页应用
  pages: {
    index: 'src/main.ts',
    another: 'src/another.ts',
  },
  pluginOptions: {
    // 微前端集成配置
    ...defineMappChild({
      mapp: [
        {
          // 默认为 <packageName> + upperFirst(<entry>)
          // name: 'playgroundVue3',

          // entry 必须为上面 pages 中定义的 key
          entry: 'index',

          // 默认为 /<name>
          // activeRule: '/playgroundVue3',
        },
        {
          // entry 必须为上面 pages 中定义的 key
          entry: 'another',
          activeRule: '/playgroundVue3Another',

          // 独立模式
          independent: true,
        },
      ],
    }),
  },
});
4. 支持 Web Component 识别
基座暴露了一些 Web Component 给子应用使用。为了避免 Vue 将这些组件识别为 Vue 自定义组件,需要一些额外的配置。
Vue 3 配置如下
$ pnpm add @wakeadmin/vue-cli-plugin-ce -D
然后在 vue.config.js 中配置:
const { defineConfig } = require('@vue/cli-service');
const { defineCE } = require('@wakeadmin/vue-cli-plugin-ce');

module.exports = defineConfig({
  transpileDependencies: true,
  parallel: false,
  pluginOptions: {
    ...defineCE({ customElement: /wkc-/ }),
    // ... 其他配置
  },
});
INFO
你也可以手动配置:
// vue.config.js
module.exports = {
  chainWebpack: config => {
    config.module
      .rule('vue')
      .use('vue-loader')
      .tap(options => ({
        ...options,
        compilerOptions: {
          // treat any tag that starts with ion- as custom elements
          isCustomElement: tag => tag.startsWith('wkc-'),
        },
      }));
  },
};
Vue2 配置如下::
直接 use 基座时会自动配置
import Bay from '@wakeadmin/bay';

// Bay 会自动配置 Vue.config.ignoredElements
Vue.use(Bay);
INFO
你也可以手动配置:
Vue.config.ignoredElements = [/^wkc-/];
5. 移除组件库样式
在布局与主题 中提到: element-ui、element-plus 的样式都外置到主题包中。 因此我们建议将 element-ui/element-plus 相关的样式移除。 详见 移除组件库样式
6. 挂载应用
6.1 Vue 2 示例
原始代码:
import Vue from 'vue';

import App from './App.vue';
import router from './router';
import store from './store';

Vue.config.productionTip = false;

(new Vue({
    router,
    store,
    render: h => h(App),
  })).$mount(#)
调整为:
import Vue from 'vue';
import Bay from '@wakeadmin/bay';

import App from './App.vue';
import router from './router';
import store from './store';

Vue.config.productionTip = false;

Vue.use(Bay);

let instance: Vue;

Bay.createMicroApp({
  /**
   * 启动时被调用。全局只会调用一次。
   */
  async bootstrap(props) {
    console.log('bootstrap', props);
  },

  /**
   * 挂载, 会调用多次。
   */
  async mount(container, props) {
    console.log('mount', props);

    instance = new Vue({
      router,
      store,
      render: h => h(App),
    });

    instance.$mount(container?.querySelector('#app') || '#app');
  },

  /**
   *  卸载
   */
  async unmount(props: any) {
    console.log('unmount', props);

    if (instance) {
      instance.$destroy();
    }
  },

  /**
   * props 更新,可选
   */
  async update(props: any) {
    console.log('update', props);
  },
});
首先使用 Vue.use(Bay) 注册插件, 接着使用 Bay.createMicroApp 创建微应用。 这里重点关注 mount、unmount 两个生命周期。 后面基座就知道如何接管子应用的渲染了。
6.2 Vue 3 示例
原始代码:
const router = createRouter({
  // 基座路由必须使用 hash 模式
  history: createWebHashHistory(),
  routes,
});

const app = createApp(App).use(store).use(router);

app.mount('#app');
调整为:
import { createApp, App as TApp } from 'vue';
import { createRouter, createWebHashHistory } from 'vue-router';
import Bay from '@wakeadmin/bay';

import App from './App.vue';
import { routes } from './router';
import store from './store';

let app: TApp;

Bay.createMicroApp({
  async bootstrap() {
    console.log('bootstrap vue3');
  },
  async mount(container, props) {
    console.log('mount vue3', props);

    const router = createRouter({
      history: createWebHashHistory(),
      routes,
    });

    app = createApp(App).use(store).use(router).use(Bay);

    app.mount(container?.querySelector('#app') ?? '#app');
  },

  async unmount() {
    console.log('unmount vue3');

    app.unmount();
  },

  async update() {
    console.log('update vue3');
  },
});
TIP
你也可以使用 qiankun 原生的导出模块挂载方式, 这种方式需要额外配置 webpack 的 output 配置。
7. 调用基座 API
基座暴露了一些组件和 API 供子应用调用。
其中, 组件以 Web Component 形式暴露,全局可以使用,不需要额外导入,直接就可能使用:
<template>
  <div class="my-page">
    <wkc-header>
      <!-- content -->
    </wkc-header>
  </div>
</template>
API 可以通过 @wakeadmin/bay 调用:
import bay from '@wakeadmin/bay';

// 退出登录
bay.logout();
INFO
基座的详细 API,见 基座 API
8. 减法
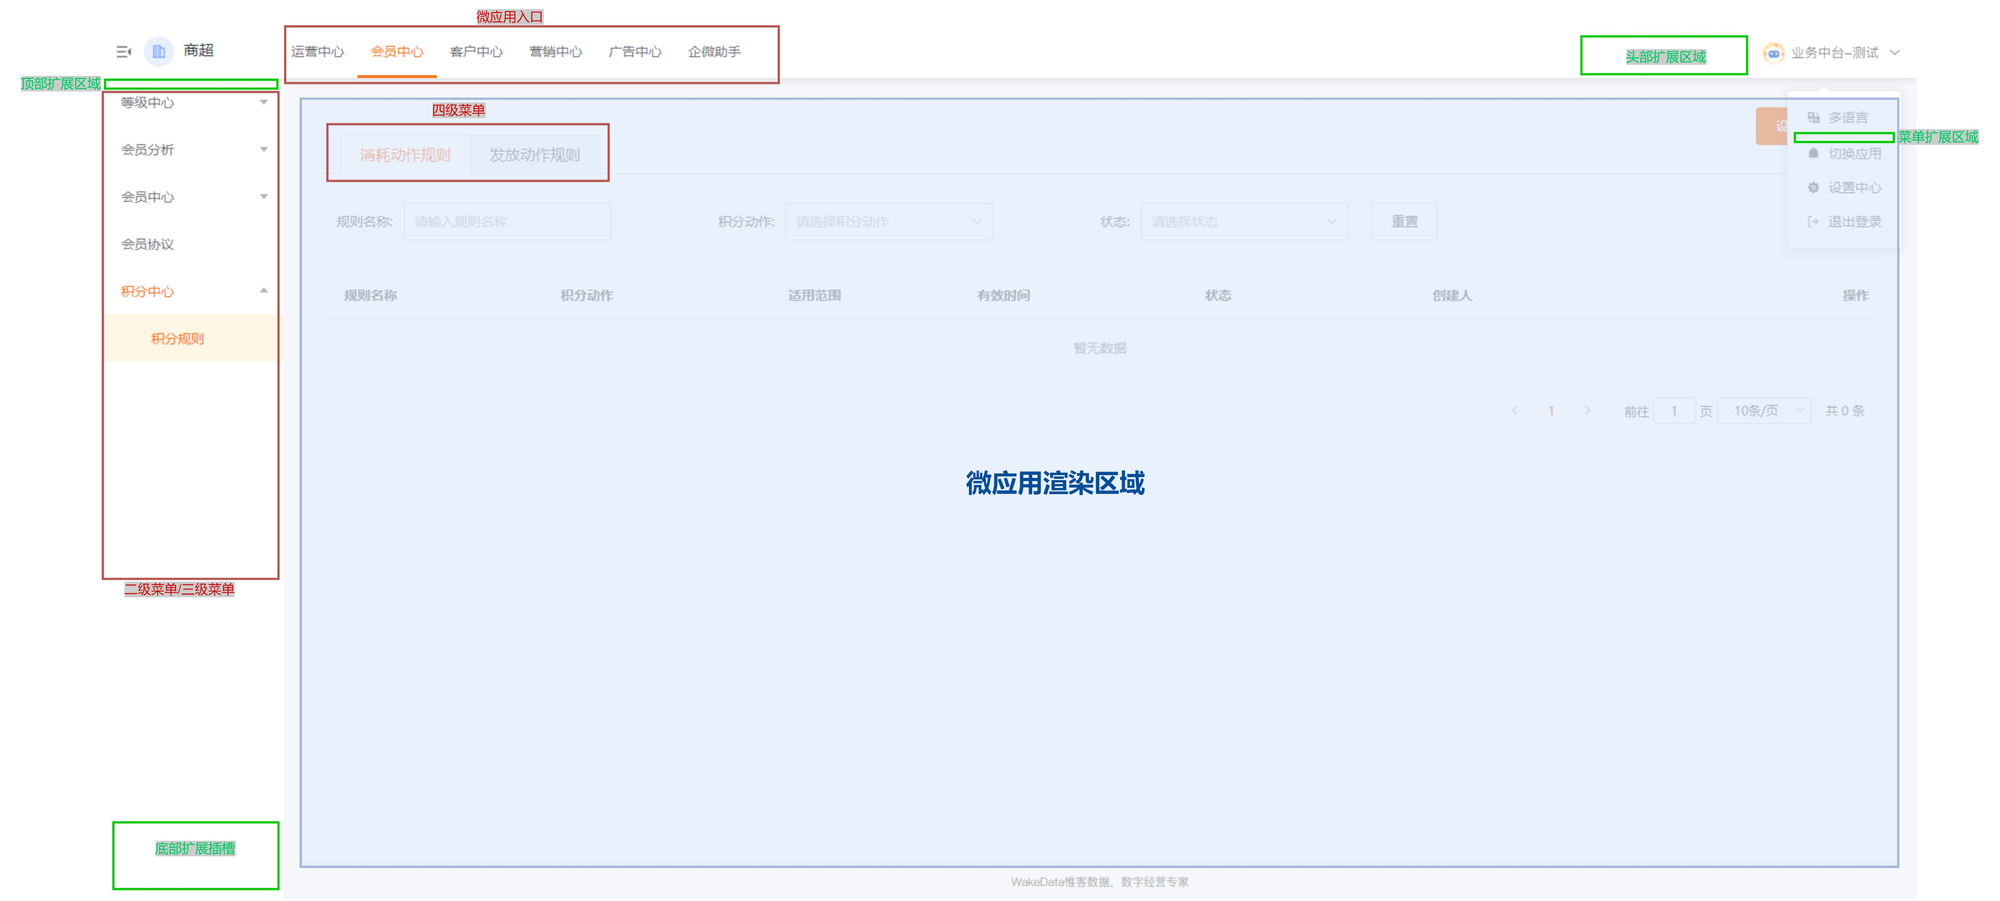
基座负责了整个页面框架的渲染,比如侧边栏、顶部菜单栏、权限、路由管理、会话管理等等。所以子应用就没必要再处理这些事情了:
- 移除顶部菜单栏
- 移除侧边栏
- 移除权限判断相关代码
- 移除 401 跳转到登录页面(基座会全局拦截)
- 移除 检查登录状态相关代码
- 页面布局使用基座提供的组件
- 移除组件库样式包
- 移除接口代理配置
- 迁移 i18n 初始化代码到
@wakeadmin/i18n或@wakeadmin/i18n-legacy - 移除不必要 polyfill 代码
- ...
9. 避免硬编码配置信息
我们应该避免在代码中硬编码配置信息,比如域名信息、企业文案、服务器链接。而是预留模板, 在部署时通过运行容器来配置。
TIP
阅读本节之前,你可能需要先了解 运行容器
1. 首先是文案信息,可以使用 assets 库或者语言包, 详见 主题包。
2. 对于配置信息,应该从 process. 中获取,比如 publicPath 在 vue-cli 下可以通过 process. 引用:
-// ❌ 硬编码域名信息
-const defaultImage = 'https://example.com/__apps__/myapp/test.png'
+// ✅ 通过编译常量获取
+const defaultImage = `${process.env.BASE_URL}test.png`
不过,对于应用内的静态资源,不应该通过组装 URL 的形式来访问,而是通过模块导入:
-// ❌ 通过 URL 访问应用独占的静态资源
-const defaultImage = 'https://example.com/__apps__/myapp/test.png'
+// ✅ 使用模块导入
+import defaultImage from './test.png'
TIP
@wakeadmin/vue-cli-plugin-mapp-child 下,默认的 publicPath 是子应用的部署目录:
- 开发环境:
${devServer.https ? 'https:' : 'http:'}//localhost:${devServer.port}/ - 生产环境:
[%= cdnDomain ? '//' + cdnDomain : '' %][%= removeTrailingSlash(base) %]/__apps__/${name}/。 关于模板变量的使用详见 部署
按照 webpack 的约定, publicPath 应该以 '/' 结束
vue-cli 中,只有 NODE_ENV 和 BASE_URL 两个内置变量,大多数场景你还是需要自定义变量。 自定义变量有两种方式:
- 使用 环境变量
- (推荐) 使用
@wakeadmin/vue-cli-plugin-mapp-child的constants参数
假设我们要创建一个 CDN_ORIGIN 变量, CDN_ORIGIN 表示 CDN 源 URL,形式如 https://cdn.xxx.com:port(结尾没有 '/')
// vue.config.js
const { defineConfig } = require('@vue/cli-service');
const { defineMappChild } = require('@wakeadmin/vue-cli-plugin-mapp-child');

module.exports = defineConfig({
  transpileDependencies: false,
  pluginOptions: {
    ...defineMappChild({
      // ... 其他配置
      constants: {
        CDN_ORIGIN:
          process.env.NODE_ENV === 'development'
            ? // 开发环境, 随意,可以直接用线上地址
              'https://cdn.wakedata.com'
            : // 生产环境使用模板, 通过运行容器注入
              `[%= cdnDomain ? '//' + cdnDomain : '' %]`,
      },
    }),
  },
  lintOnSave: false,
});
代码使用示例:
-const PREVIEW_URL = 'https://cdn.wakedata.com/resources/preview.html'
+const PREVIEW_URL = process.env.CDN_ORIGIN +  '/resources/preview.html'
在 html 模板中、SCSS、LESS 文件中,我们也可以使用这些变量:
<html>
  <head>
    <!-- ... -->
    <!-- html-webpack-plugin 默认使用的是 lodash template 语法 -->
    <script src="<%= CDN_ORIGIN %>/resources/lib/wxapi.js %>"></script>
  </head>
</html>
SCSS 文件示例:
.demo {
  background-image: url($CDN_ORIGIN + '/resources/hello.png');
}
LESS 文件示例
.hello {
  background: url('@{CDN_ORIGIN}foo.img');
}
10. 本地调试
Ok, 一切准备就绪, 开始本地调试。
我们不需要在本地启动基座、登录等页面。只需要启动子应用本身即可:
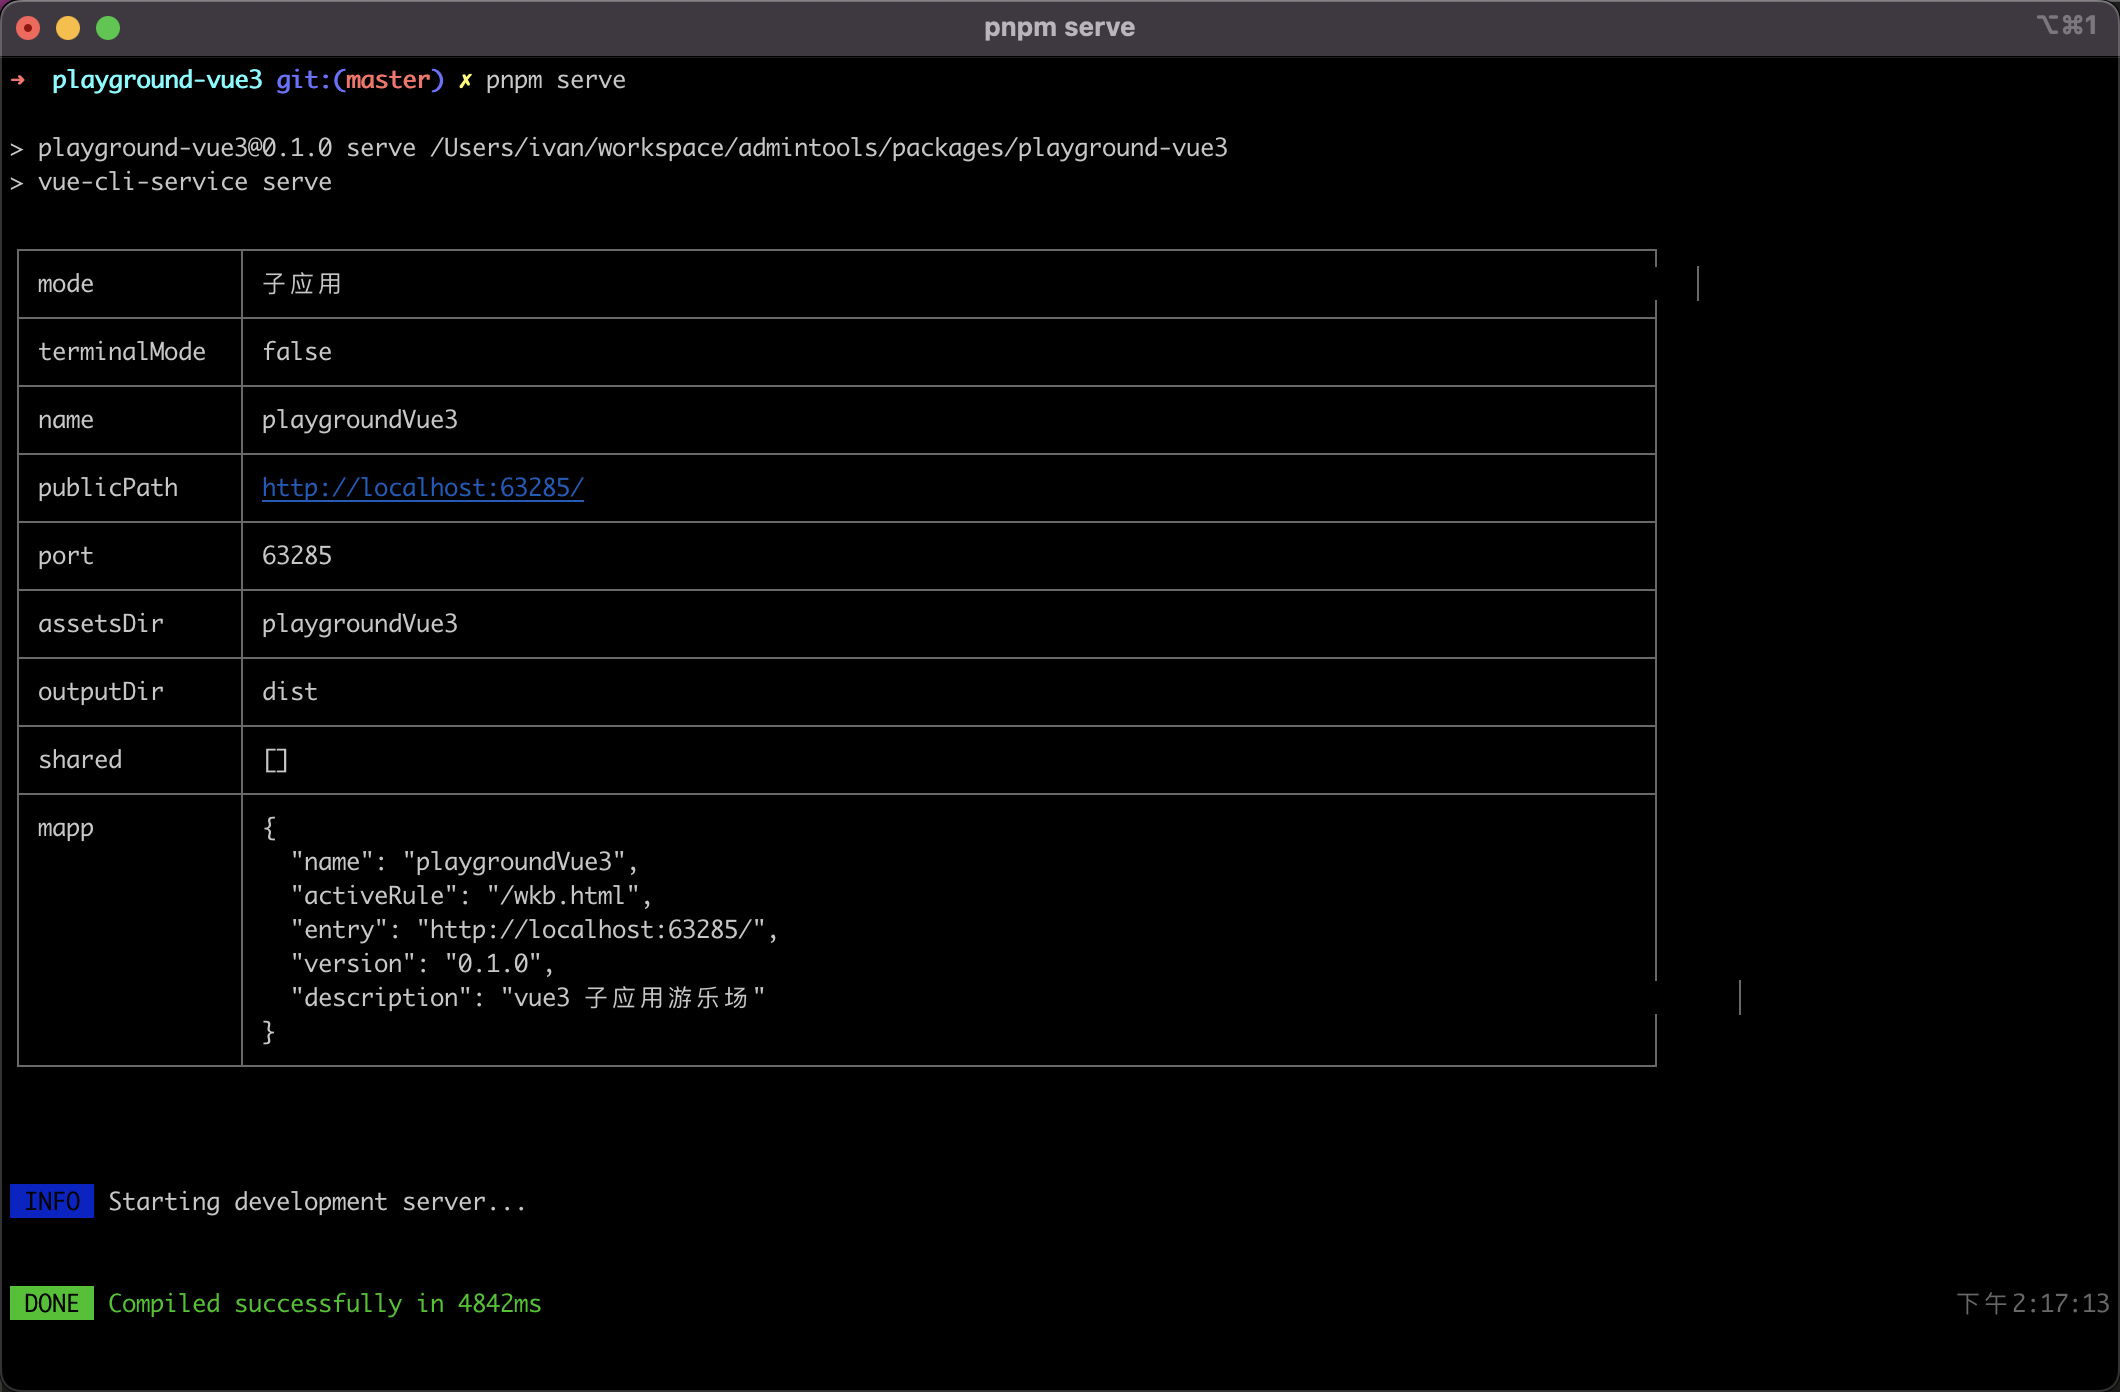
子应用启动后,会在控制台输出应用描述信息。
假设基座部署在 https://bizpf-test.wakedt.cn/portal/(测试环境、生产环境都可以), 我们打开对应的调试页面: https://bizpf-test.wakedt.cn/portal/__debug__,将上面控制台输出的本地子应用的描述信息录入:
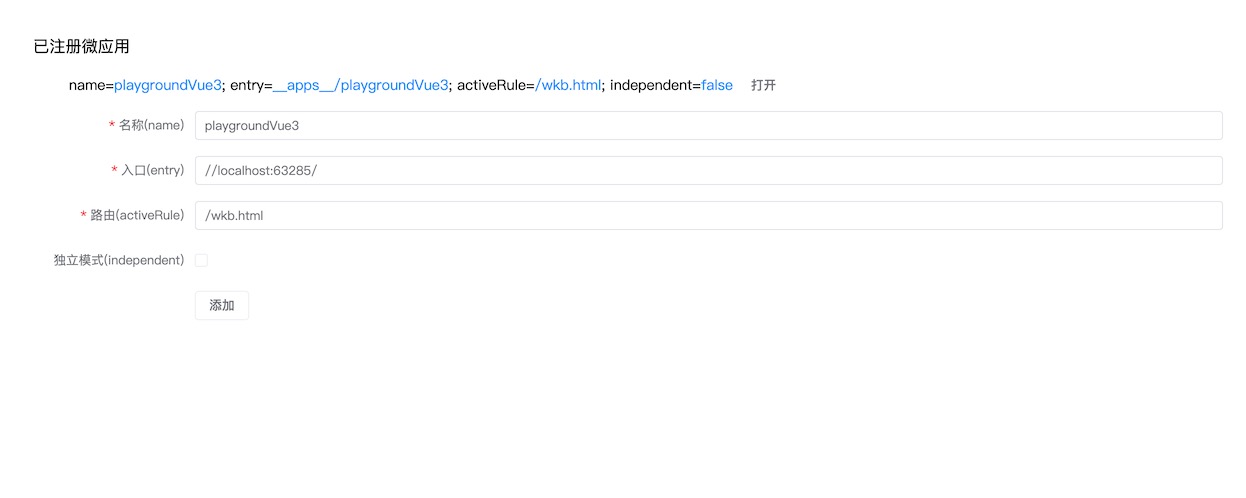
点击打开,基座就会从你配置的 entry 中拉取子应用。
DANGER
💥异常: Mixed Content: The page at 'https://bizpf-test.wakedt.cn/portal/wkb.html' was loaded over HTTPS, but attempted to connect to the insecure WebSocket endpoint 'ws://192.168.2.109:63285/ws'. This request has been blocked; this endpoint must be available over WSS
解决办法:需要开启 https 模式。通常测试环境、生产环境的基座都是以 HTTPS 伺服的,这里面加载 HTTP 的资源会报以上错误。这时候我们需要开启 https 模式:
// vue.config.js
const { defineConfig } = require('@vue/cli-service');

module.exports = defineConfig({
  devServer: {
    https: true,
  },
  // 其他配置
});
DANGER
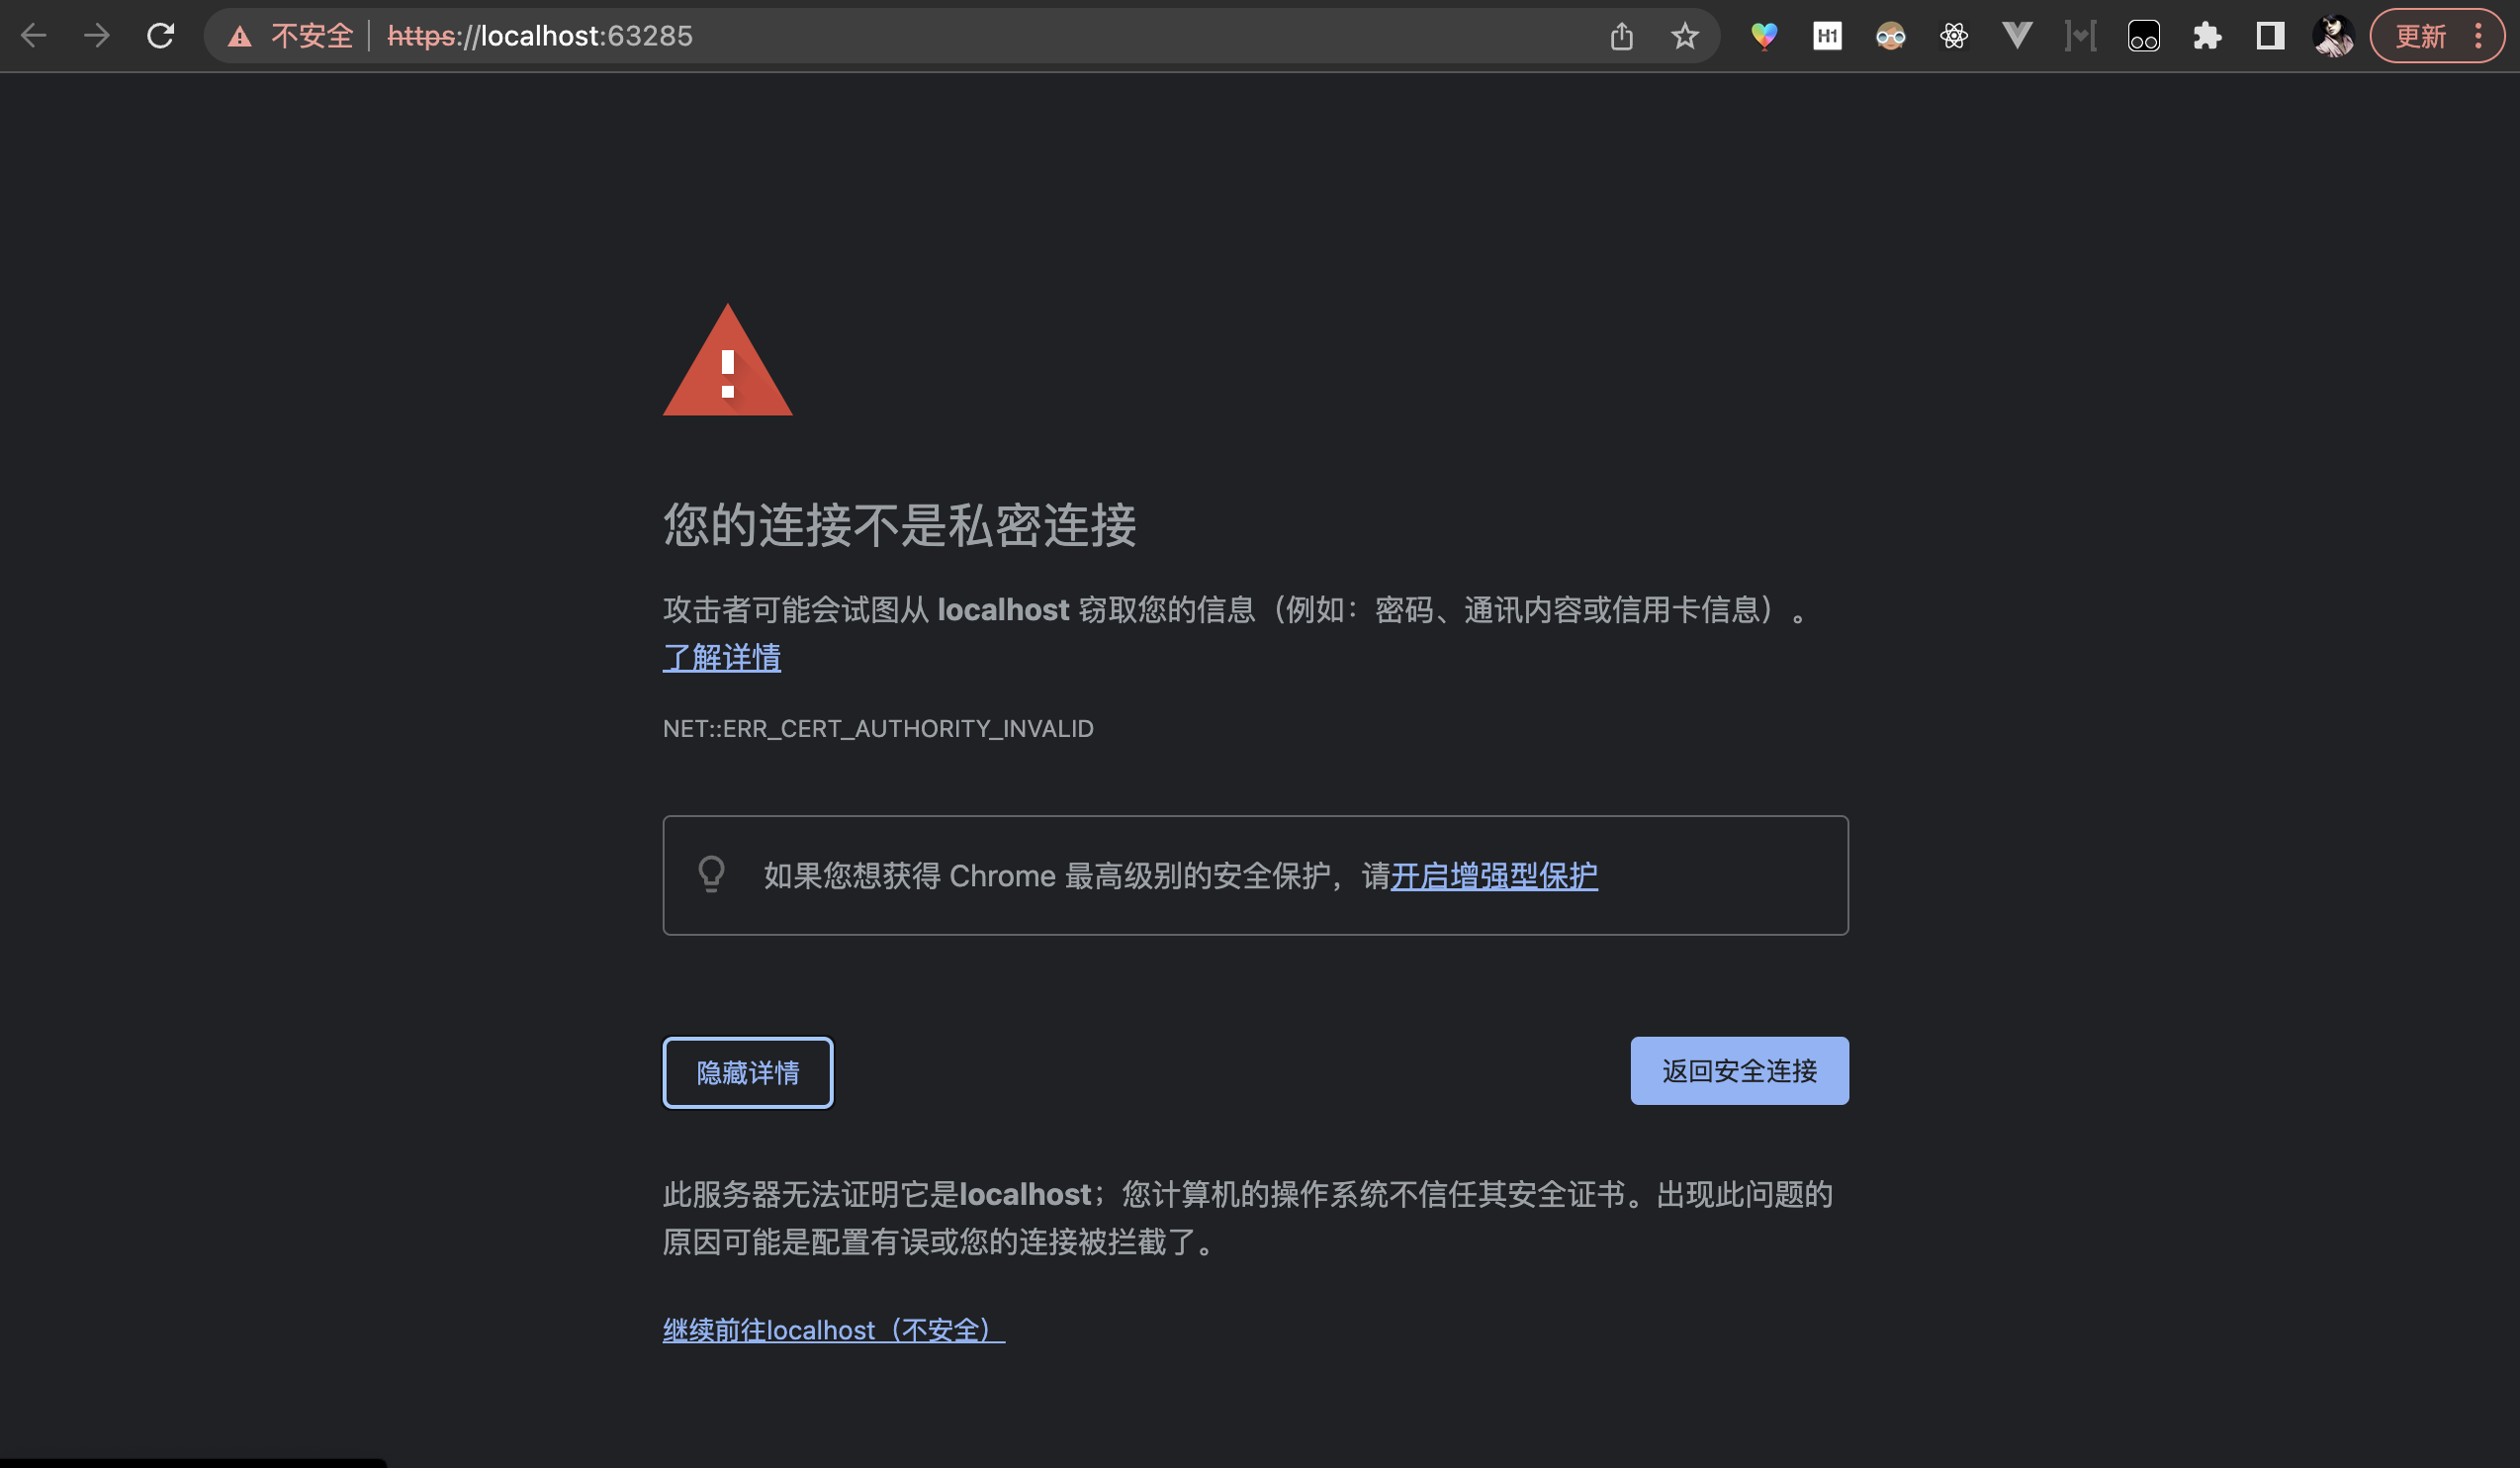
💥异常: GET https://localhost:63285/ net::ERR_CERT_AUTHORITY_INVALID
需要手动打开响应链接 ‘信任’ 一下:
现在打开对应的链接,比如 https://bizpf-test.wakedt.cn/portal/wkb.html, 渲染的就是你的子应用啦。
INFO
本地接口代理还需要吗?
大部分场景不需要了。因为子应用在测试/生产环境的基座下渲染,请求的接口默认就是对应环境的,不需要配置任何接口代理。
除非你想请求测试环境没有的接口,比如代理到某个开发者的本地服务器。这时候需要配置代理:
// vue.config.js
const { defineConfig } = require('@vue/cli-service');

module.exports = defineConfig({
  // 其他配置
  devServer: {
    proxy: ['/permission', '/wd'].reduce((prev, cur) => {
      prev[cur] = {
        target: 'http://192.168.0.108/', // 某个开发者的本地地址
        changeOrigin: true,
        secure: false,
      };

      return prev;
    }, {}),
  },
});
对应的接口请求也要强制走本地:
const baseUrl = process.env.NODE_ENV === 'development' ? process.env.BASE_URL : '/'; // BASE_URL 就是 publicPath

const getSomething = () => {
  httpRequest(`${baseUrl}wd/xxx/xxxx`, {});
};
TIP
还有一个建议: 建议打开 source-map, 这样 vue 应该会更好调试:
// vue.config.js
const { defineConfig } = require('@vue/cli-service');

module.exports = defineConfig({
  configureWebpack() {
    return {
      // 可以获取更好的调试体验
      devtool: 'source-map',
    };
  },
});
11. 部署
最后就是部署上线了。我们现在都采用容器部署(相关教程见 前端项目容器标准化部署、单 nginx 容器生成和部署)。
先来创建一个 Dockerfile 文件:
FROM wkfe/mapp-child

COPY ./dist /data
很简单,就两行。接下来构建和发布建议走 Jenkins, 并在 Rancher 上部署。你可以看我们的 Jenkins + Rancher 构建案例。
TIP
wkfe/mapp-child 的默认拷贝规则:
__public__拷贝到/mnt/__public__- 其余的拷贝到
/mnt/__apps__
关于整个微前端项目如何部署和运行,见 部署。
关于 wkfe/mapp-child 的细节,可以看这里
12. 注册子应用
注册子应用有两种方式:
- 自动发现。当子应用部署到
__apps__目录下后, 微前端运行容器 会自动发现并注册。 - 手动注册。手动将描述信息注册到运行容器的配置文件中
13. 其他
独立模式
将 independent 开启后,基座会为该子应用创建一个独立的路由,这个页面由该子应用独占渲染。换句话说,就是子应用不会在菜单框架下渲染。
适用于登录、应用切换这类不在主页面下运行的页面。
菜单多语言
基座不会维护子应用的菜单多语言包,这个由子应用自行注册。 详见 菜单多语言注册
菜单图标
同样,基座提供了内置的图标,如果基座想要自定义图标也可以通过 registerAsset 接口注册。